Made in USA
Email for any questions before or after ordering: email.address

PayPal account email address is assumed same as discussions.
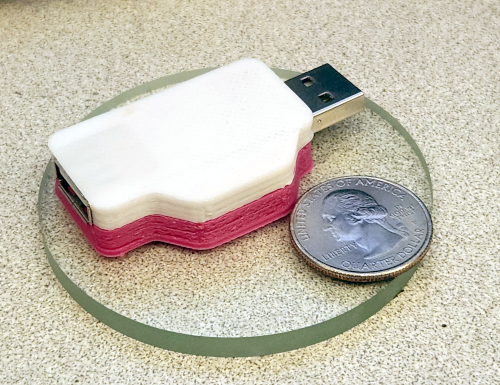
AutoCharge USB Device
AutoCharge

A highly configurable, slightly complicated power management system for USB charging, with data passthrough for communication or QC protocol. PD not supported due to the USB-A connectors, but capable of 40V and 5.8A.

Note: Most devices use power to detect USB for communication, so won't detect that they're plugged in when not charging.
Not intended for power banks, as the AutoCharge is a constant load, which prevents them from shutting down to prevent drain from the internal power circuitry.

$23.95

Setup:

Download EspTouch for iPhone or Andriod
Switch to the 2.4G SSID of your router.
Plug the AutoCharge into a USB charger or PC (the blue LED will pulse when waiting for EspTouch).
Open EspTouch and enter you router's password.
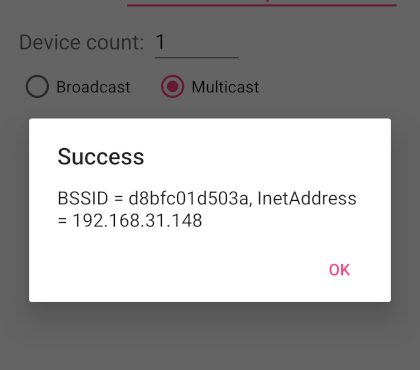
Set the device count to 1, select Multicast, and CONFIRM to begin.
When it connects, the local IP address of the AutoCharge will be shown in a popup. Write this down or take a screenshot.
The LED will pulse faster for a few seconds as it connects. If it continues to pulse, there's a problem connecting.
Important: Set this IP to static in your router. Different routers use different methods. Search for how to do this for your specific model.
Keep a bookmark for quicker access later.
To clear the credentials, press and hold the button on the device for 6 seconds.


esptouch connect
Web UI:

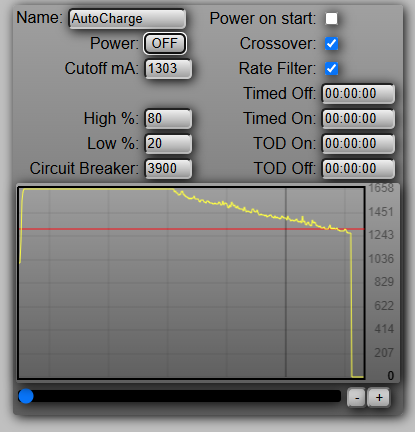
Open a web browser, and enter the above IP address. You will see the page shown to the right →
Power on start turns the output power on when plugged in.
Power: turns the output on and off by clicking. The button on the device does the same.
Cutoff mA turns the power off when the current crosses below this value.

To find the current level for a specific battery percent, you'll need to watch it as your phone charges.
0 disables the current sensing.

Crossover requires the current to reach above the value, then drop below. Without crossover, it will shut off any time the current is below the set value.
Timed Off starts any time the power is switched off, and turns it on when it reaches 0h:0m:0s.
Timed On starts any time the power is switched on, and turns it off when it reaches 0h:0m:0s.
TOD On and Off is time of day, which is a little easier than scripting.

0 disables the timers.
Cancel stops the current timer without changing the power state.
The Timed Off can be combined with the current cutoff, for example to charge to a specified level every 12 hours. Timed On should be disabled.

Circuit Breaker stops the output immediately if the power runs over the set value.

High % and Low %:

There are 4 main URL parameters to control AutoCharge for automated charging.
power=0 or power=1 to switch the device on and off. Example: http://192.168.31.148/cmd?power=1 (replace the IP with your own).
batt=%BATT (0-100) to trigger the High % or Low %. If the value is equal to or lower than Low %, it will switch on, so the value can be sent at an interval if needed, and it will be processed according to the high/low rules.


AutoCharge Web UI
Andriod (Tasker):

Download Tasker on Google Play
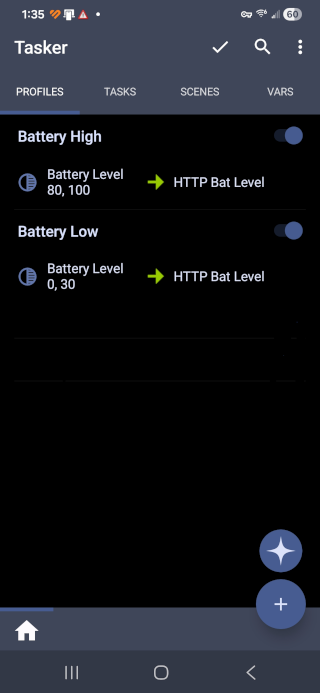
Create 2 profiles. One for high and one for low battery.
Tap the + icon, and select State then Power then Battery Level
Adjust the settings from 80 to 100 for the "High" profile, and 0 to 20 for the "Low" profile.
Tap the back button and select the New Task + option.
Name the first "Send battery high" and second one low.
Tap + on the blank page, and select the Action catagory: Net, then HTTP Request.
For the Battery High action:
URL: http://192.168.31.148/cmd?power=0
For the Battery Low action:
URL: http://192.168.31.148/cmd?power=1
(Replace the IP address with the one your AutoCharge is assigned to)
Check Trust Any Certificate and Structured Output. Nothing else needs to be changed.

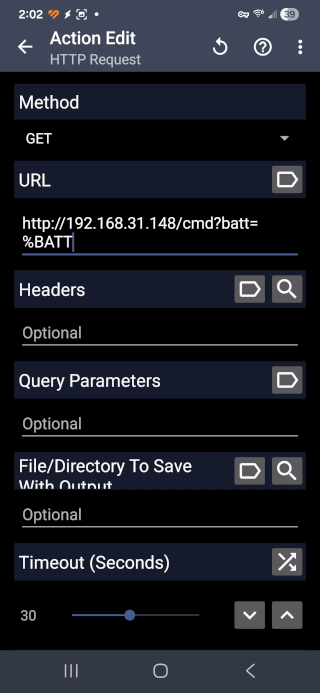
Advanced: For a single action for both, you can use the URL: http://192.168.31.148/cmd?batt=%BATT

Test it by selecting a task, and tapping the play button at the bottom. Debugging info will be displayed if it fails. If you're still viewing the web page, you'll see a notification at the bottom of the page.

To start charging, for example 1 hour before the alarm clock, go back to the Profiles tab, tap the + icon and select Time. Set both the From and To sliders/clocks to your exact desired time. Tap the back button, and select the Battery Low task (power=1) setup above.

Note: All commands, including /cmd?query=0 will return a JSON structured response, with values power, current, toffSec, tonSec for advanced control scripting.

tasker1
tasker2
iPhone (Shortcut scripting):

Open the Shortcuts app on your iPhone and tap the Automation tab at the bottom of the screen.
Tap the + icon in the top right corner.
Scroll down and select Battery Level.
Drag the slider to your desired battery percentage (e.g., 20%), choose Falls Below and tap Next.
Tap Add Action, type "URL" into the search bar, and select URL.
Input http://192.168.31.148/cmd?power=1 and tap Done.
(Replace the IP address with the one your AutoCharge is assigned to)
Disable the Ask Before Running toggle.
Tap Add Action again, search for Get Contents of URL, and add it to the shortcut chain (to make it silent).
After completing this, do the same again for the high level.
This time drag the slider to 80% and select Rises Above 80%, and input http://192.168.31.148/cmd?power=0 and tap Done.

To start charging, for example 1 hour before the alarm clock, create a Time of Day automation, select the time and repeat Daily, then Add Action and enter the URL and Get Contents as above.


CuriousTech™ Copyright © 2003-2026 Curious Technology